Why Your Room Matters More Than Your Gear
You can own a pair of flagship monitors, a pristine converter, and the finest headphone amplifier on the market — but if your room lies to you, none of it matters. The mixing environment is the single most influential variable in your entire monitoring chain. Think of it this way: a vocal recorded in a tiled bathroom sounds like a vocal recorded in a bathroom, regardless of the microphone. The room imposes its own acoustic signature on everything you hear. In a mixing room, that signature colors every decision you make — your EQ cuts, your compression ratios, your stereo width — and those decisions may not translate anywhere else.
The sobering reality for most producers is that the room you mix in is often something you inherit, not something you design. But understanding the acoustic principles at play gives you the power to work with your space, not against it. This guide breaks down the technical blueprint of a good mixing room so you can build a listening environment that tells you the truth.
The Physics of Sound in Small Rooms
Most home studios live in a space that is acoustically small — bedrooms, basements, converted garages. In these rooms, the behavior of sound is dominated by reflections and resonances that simply don’t occur in larger or more controlled environments.
Reflections are the most obvious issue. The direct sound from your monitor reaches your ears first, but that same sound bounces off walls, the ceiling, the desk, and the floor before arriving milliseconds later. These delayed copies interfere with the original signal, creating constructive and destructive interference at specific frequencies. This is comb filtering — a series of peaks and nulls in your frequency response that vary depending on where you sit.
Standing waves (room modes) are the bigger beast. When a wavelength matches the distance between two parallel surfaces, it reinforces itself and creates a resonant buildup at that frequency. The fundamental axial modes — between front and rear walls, side walls, and floor and ceiling — are the most powerful. Tangential and oblique modes, though lower in energy, still add unevenness. In a typical 12 by 10 foot bedroom, you will likely have a serious mode somewhere between 45 Hz and 120 Hz that makes bass response wildly inconsistent depending on where you stand or sit.
The Schroeder frequency is the approximate cutoff above which the room’s modal behavior becomes statistically diffuse. Below that frequency, the room behaves as a resonant cavity with identifiable modes. For a small room, the Schroeder frequency might sit around 200–300 Hz. Everything below that needs to be tamed with careful geometry and absorption. Everything above that can be managed with broadband absorption and diffusion.
Room Dimensions and the Golden Ratio
If you have the luxury of choosing or building your mixing space, room dimensions are the first variable to optimize. The goal is to avoid dimensions that share integer multiples, which concentrate modal energy at overlapping frequencies. A square room, or one where the length is exactly twice the width, will produce severe modal clustering.
Several classic dimension ratios have been developed to spread modes more evenly across the frequency spectrum. The most well-known options include:
- 1 : 1.14 : 1.39 — a common recommendation from the BBC and other broadcast standards
- 1 : 1.28 : 1.54 — another widely used ratio that offers good modal distribution
- 1 : 1.60 : 2.33 — a ratio often seen in larger control rooms
You can enter your room measurements into a mode calculator (many are free online) to see how your proposed dimensions plot out. If the resulting modal peaks are spread relatively evenly across the low end, you are in good shape. If multiple modes cluster at the same frequencies, consider a different ratio.
That said, most of us work with the room we have. The value of understanding ideal ratios is not that you will rebuild your walls — it is that you know which frequencies are likely to be problematic in your space and can prioritize treatment accordingly.
Acoustic Treatment: Absorb, Diffuse, Trap
Acoustic treatment is not about making the room sound ‘dead.’ It is about controlling the balance of direct and reflected sound so that your ears hear a reasonably neutral version of what the monitors are outputting. There are three categories of treatment, each with a different job.
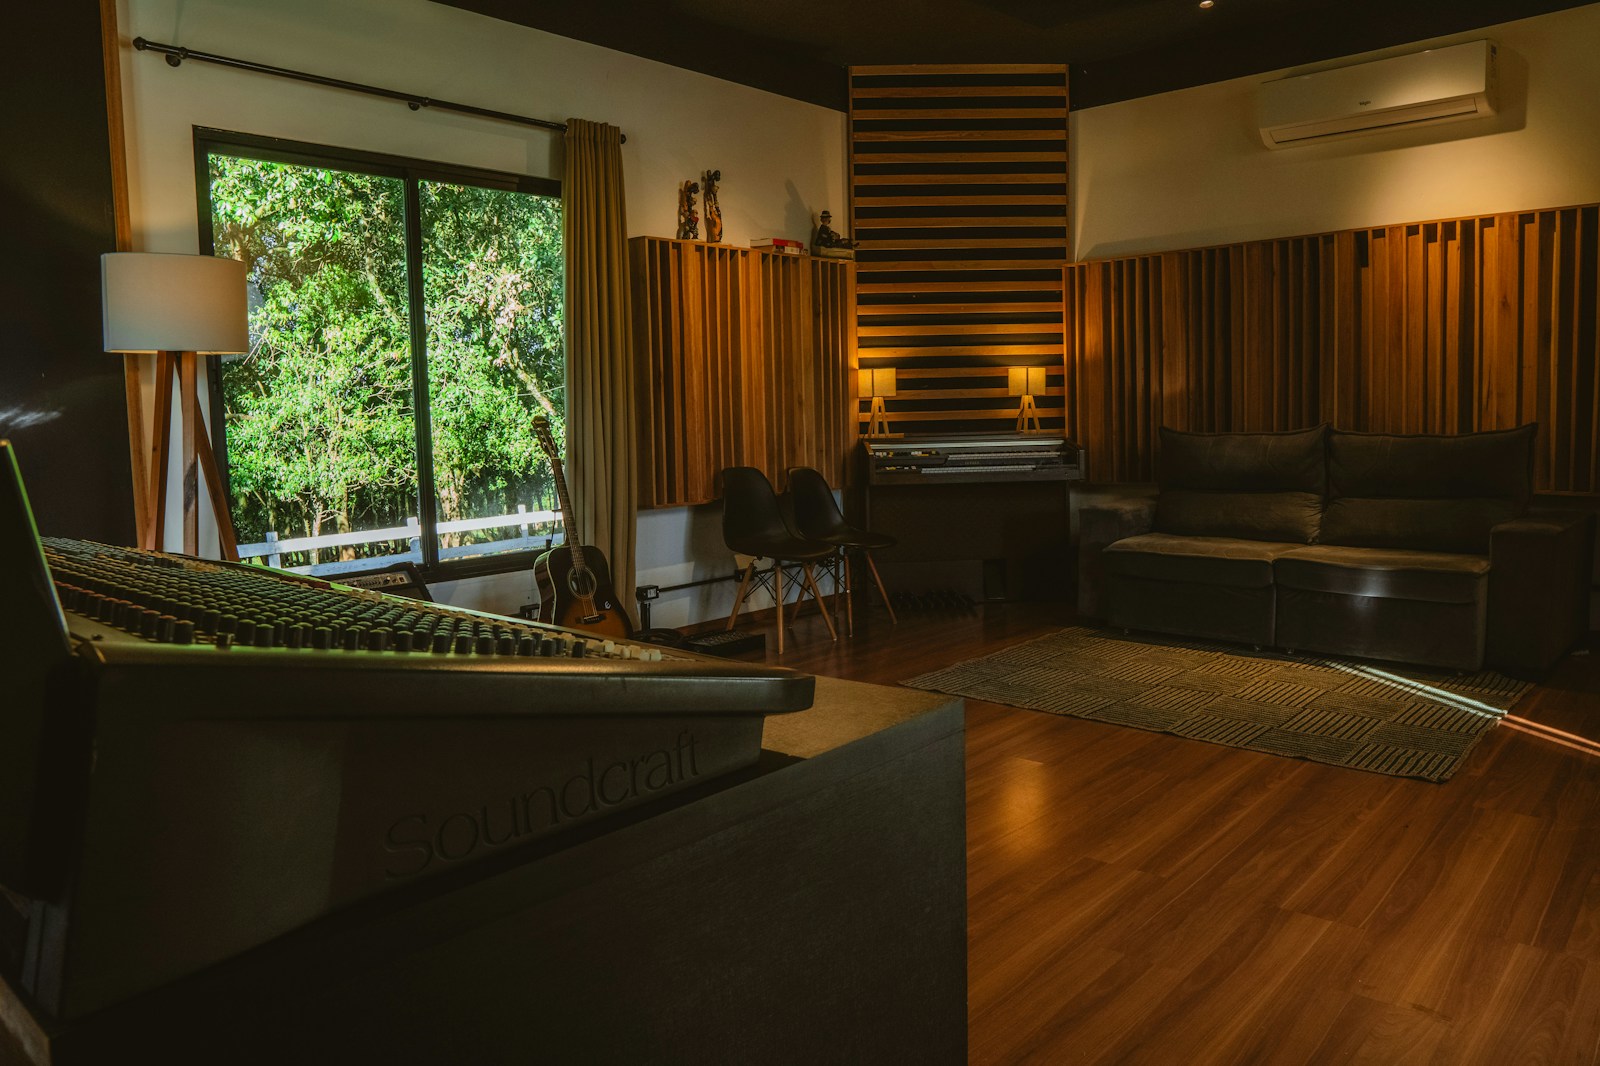
Absorption eliminates reflected energy by converting it to heat. Broadband absorbers — typically thick panels of rigid fiberglass or mineral wool — are most effective in the mid and high frequencies. Place them at first reflection points: the side wall positions where you see the speaker when you sit in the listening position and hold a mirror flat against the wall. Also cover the ceiling reflection point and the rear wall behind your head. Thin foam panels only absorb high frequencies, leaving the midrange and low end to bounce around unaddressed.
Diffusion scatters sound rather than absorbing it. A diffusor on the rear wall behind your listening position can break up strong reflections without creating a dead zone. Diffusion is most useful in rooms that need to retain some liveliness for comfort, but it is not a substitute for absorption at critical reflection points.
Bass traps handle the low-end modal energy that absorption panels cannot touch. Porous bass traps (thick, dense panels placed in corners) use the same fiberglass or mineral wool but rely on depth to absorb longer wavelengths. Membrane traps use a resonant panel tuned to a specific frequency range. For most home studios, corner-mounted porous traps built from 6-inch thick rigid fiberglass are the most practical and cost-effective solution. Target the corners where two walls meet the floor and the ceiling — these are pressure zones where low-frequency energy accumulates.
Flutter echo — a metallic ringing in the high end — can be handled with absorption or diffusion panels placed on parallel walls at an angle, or simply by adding bookshelves, soft furniture, or other irregular surfaces to break up the parallel surfaces.
Monitor Placement and the Equilateral Triangle
Monitor placement is the cheapest upgrade you can make to your mixing environment. It costs nothing but attention to detail.
The standard setup is an equilateral triangle between your head and the two monitors. The distance from your left ear to the left tweeter should equal the distance from your right ear to the right tweeter, and the distance between the two monitors should be the same as the distance from your head to each monitor. This ensures a centered stereo image and a consistent listening position.
The monitors should be aimed directly at your ears, with no toe-in angle beyond what is necessary to face the listening position. Tweeters should be at ear height. If your desk forces the monitors lower than ear level, angle them upward using monitor stands or wedges — not by tilting the speakers themselves in a way that creates boundary reflections off the desk surface.
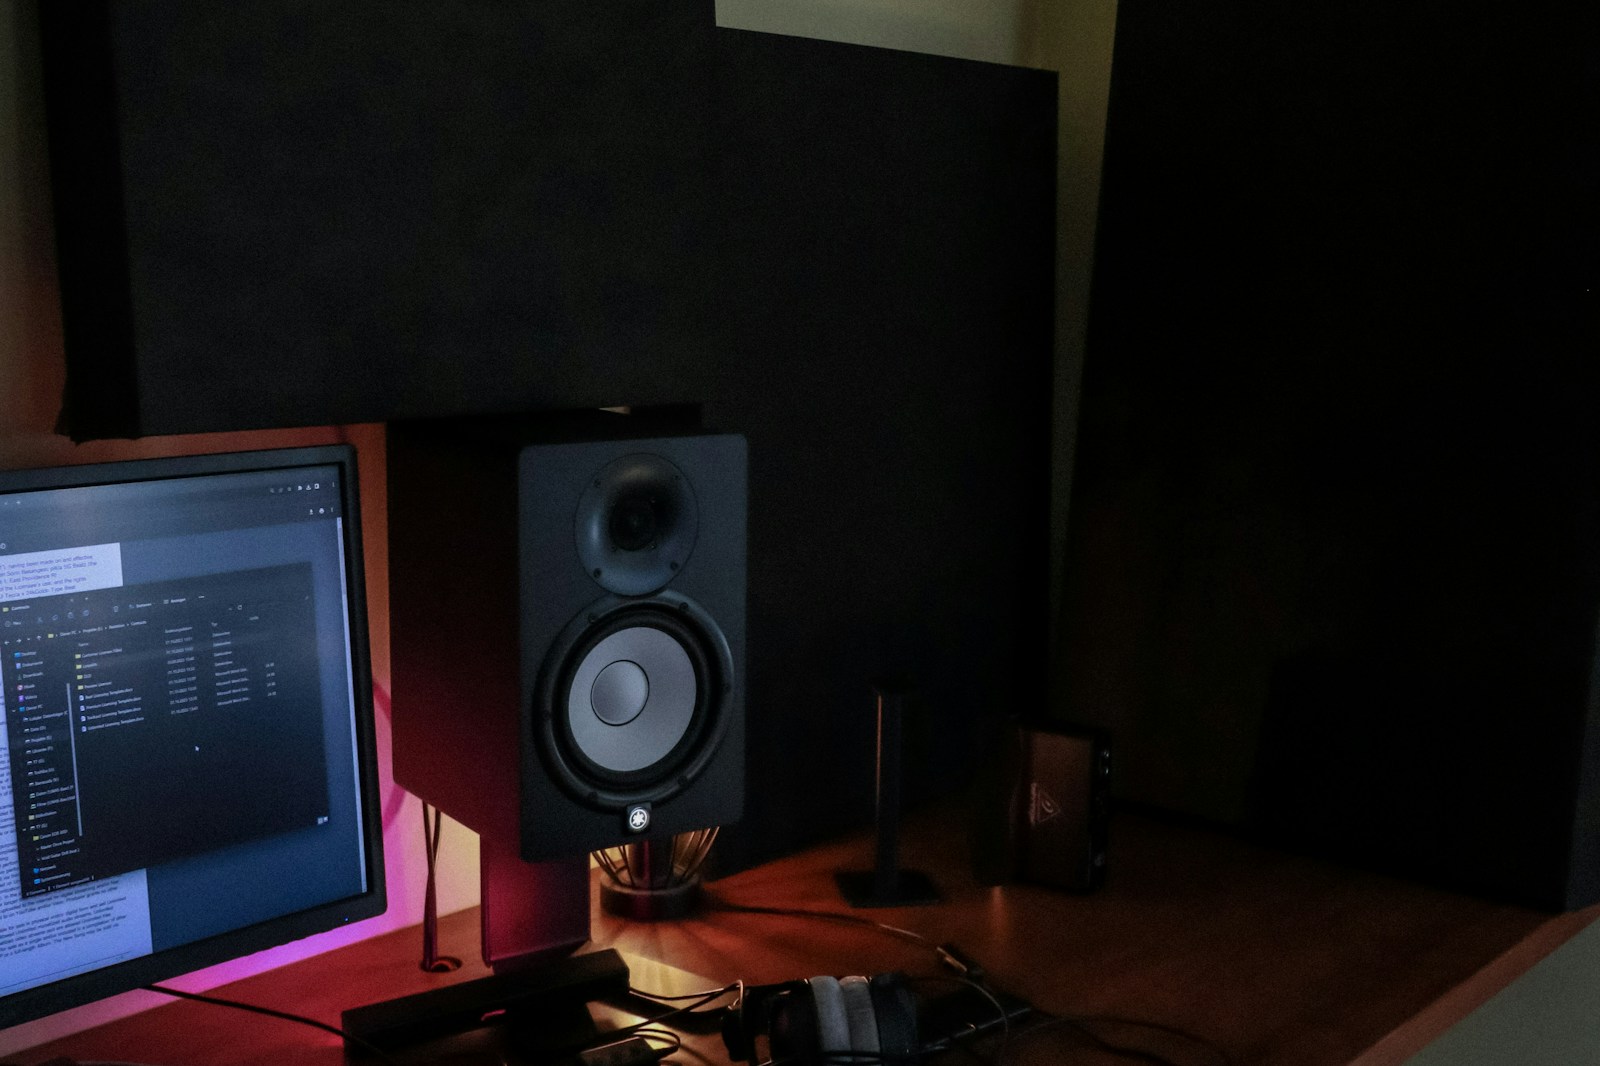
Keep monitors away from walls. A speaker placed close to a wall suffers from boundary interference: the reflected sound from the wall arrives nearly in phase with the direct sound, boosting low frequencies by up to 6 dB. A general guideline is to keep the rear of the speaker at least 12–18 inches from the front wall, and further from side walls if possible.
Invest in monitor isolation pads or stands. Vibrational coupling between the speaker and the desk introduces low-frequency colorations that muddy your perception of the low end. Pads decouple the speaker mechanically, cleaning up the bass response at the listening position.
The Listening Position: The Sweet Spot
The listening position is the most critical single location in your room, and it is not in the center of the space. In a rectangular room, the center is a pressure zone where low-frequency modes are most intense. Placing your chair there will give you a wildly inaccurate picture of your low end.
The standard recommendation is the 38% rule: sit 38% of the room’s length from the front wall. For a 15-foot-long room, that puts your ears at roughly 5.7 feet from the front wall. This position typically avoids the worst of the axial mode buildup and offers a more balanced listening point.
Use the mirror test to confirm your first reflection points. Have someone hold a mirror flat against the side walls while you sit in the listening position. When you can see the face of the speaker in the mirror, that is where you place your absorption panel. Do the same for the ceiling reflection point above your head.
Your ears should be at the same height as the tweeters, which means your chair height matters as much as your monitor height. If you are too tall or too short for the setup, adjust the monitor stands, not your posture.
Room Correction Systems and Measurement Tools
Digital room correction — software like Sonarworks SoundID Reference, Dirac Live, or the free Room EQ Wizard (REW) — is a powerful complement to physical treatment, but it is not a replacement. Applying a massive EQ curve to fix a room with no treatment is like trying to fix a distorted recording by slapping an EQ on it after the fact. You can remove some colorations, but the timing and resonance issues remain.
That said, once your room has reasonable physical treatment, a correction system can fine-tune the remaining unevenness. The typical workflow involves measuring a sine sweep with a calibrated measurement microphone at the listening position, analyzing the impulse response and frequency plot, then applying a corrective filter curve to your monitoring chain.
If you are new to this, download REW and a miniDSP or Dayton measurement microphone. Learn to read a waterfall plot — it shows you how long each frequency lingers in the room after the sound stops. Long decay times at specific frequencies indicate modal problems that need more physical treatment. Once the waterfall is reasonably clean, apply a gentle target curve — a slight downward tilt from the low end to the high end — to your monitoring chain through Sonarworks or a convolution plugin.
Room correction should account for no more than 3–5 dB of correction per band. If you need more than that, you need more bass trapping or better monitor placement.
Common Mistakes in Home Studio Mixing Rooms
Even experienced producers make these errors. Knowing them upfront saves you time and money.
- Symmetric treatment in an asymmetric room. Placing identical panels on both side walls is only correct if the room is perfectly symmetrical. If your door or window breaks the symmetry, measure your reflection points individually.
- Acoustic foam everywhere. Thin foam panels absorb high frequencies but do nothing for the low and low-mid range. A room covered entirely in egg-crate foam will sound dead but still have a boomy, uneven low end.
- The completely dead room. A mixing room should be neutral, not anechoic. Retaining some natural ambience helps you judge reverb tails and spatial cues. Over-absorption makes your mixes sound dry in the room but overly wet on other systems.
- Forgetting the rear wall behind your ears. The wall behind your listening position is a major reflection source that colors your high-frequency perception. A broadband absorber or diffuser behind your head is essential.
- Mixing with your head against the back wall. Sitting too close to the rear wall places your ears in a pressure zone for certain frequencies. Pull your chair forward or add deep absorption behind your head.
- Relying entirely on headphones. Headphones eliminate room acoustics, but they introduce their own issues — no crossfeed, variable seal, and inconsistent bass response depending on model. Use headphones as a reference, not your primary monitoring system.
Budget-Conscious Room Optimization Checklist
You can dramatically improve a bad room without spending a fortune. Follow this prioritized checklist from cheapest to most expensive:
- Move your desk. Position it against the shorter wall of a rectangular room, with the listening position at the 38% length rule. Avoid symmetrical setups in a square room.
- Clear clutter. Remove hard, parallel surfaces near the listening position. Soft furnishings, open bookshelves, and curtains can act as improvised diffusers and absorbers.
- Adjust monitor placement. Form an equilateral triangle, aim the tweeters at ear height, and keep the monitors away from walls.
- Add absorption at first reflection points. Two panels of rigid fiberglass (4 inches thick or more) mounted at the side wall reflection points is the single most impactful upgrade for under $150.
- Build DIY bass traps. Use rockwool or OC703 panels in the corners. A bundle of six panels and some wood for frames costs roughly $100–150. Place them in vertical stacks in the corners behind your listening position.
- Add a rear wall absorber. A thick panel behind your head cleans up the high-end response considerably.
- Buy a measurement microphone. For $50–100, you can measure your room and understand exactly where the problems live. This eliminates guesswork.
- Add a ceiling absorption panel. The ceiling reflection point often gets overlooked, but it is as critical as the side walls.
- Consider a room correction system. Sonarworks SoundID Reference or Dirac Live polish the final percent of unevenness once your physical treatment is in place.
- Add diffusion if needed. A rear wall diffusor can replace a thick absorber if you want to retain some room character without sacrificing clarity.
Building a Mixing Environment That Translates
An accurate mixing room is not one that sounds good — it is one that sounds honest. It should not flatter your low end or soften your highs. It should reveal every flaw in your mix so that you fix them before anyone else hears them. That is the entire point.
You do not need a custom-designed control room to produce professional mixes. What you need is a deliberate approach: understanding the physics, treating the room for its specific problems, placing your monitors with precision, measuring your results, and using digital correction as a final polish, not a crutch.
Every step you take toward a flatter, more neutral listening environment is a step toward mixes that translate consistently across headphones, car stereos, club systems, and streaming platforms. Start with the low-cost changes — move your desk, adjust your monitors, measure your room — and build from there. Your mixes will thank you.
If you are ready to go deeper, explore our guides on DIY acoustic panel construction and monitor calibration techniques here at Ramesh Music.