Introduction
Building a DJ booth that looks and works well doesn’t have to cost a fortune. Whether you’re a mobile DJ playing weekend gigs, a bedroom producer trying to get proper monitor placement, or someone setting up for a regular night out, a dedicated booth solves real problems: keeping your gear safe, managing cables, maintaining sightlines with the crowd, and just having a smoother workflow. The trick is knowing where to spend money and where to save. This guide covers how to build a DJ booth on a budget â without ending up with something that looks like a pile of scrap wood. We’ll talk materials, construction, basic sound treatment, and the trade-offs that actually matter when cash is tight. This is practical advice based on real builds, not theoretical dreams.
Why You Need a Dedicated DJ Booth (Even on a Budget)
Lots of people start out setting up on a kitchen table or a random folding table from a garage sale. It works for a while, but it creates problems. First, gear protection. Your controller, laptop, and mixer are expensive and sensitive. A proper booth keeps them off damp floors, away from spilled drinks, and safe from accidental bumps. Second, cable management. Exposed cables look messy and create trip hazards. A booth lets you route everything cleanly, reducing stress and setup time. Third, sightlines. When your table is too low or too deep, you can’t see the audience and they can’t see you. A booth puts you at the right height and depth for both. Finally, it just looks more professional. A clean, dark booth signals that you know what you’re doing and frames you as the performer. These benefits are all achievable on a budget. You don’t need expensive materialsâyou need smart planning and a focus on what actually matters.
Essential Gear and Materials for a Budget DJ Booth
Let’s talk materials. For the frame, your best bets are 3/4-inch plywood or MDF (medium-density fiberboard). Plywood is lighter and more durable; MDF is cheaper and smoother but heavier. Both work fine. A standard 4×8 sheet runs around $30 to $50 at a hardware store. For legs, you can use 2×4 lumber cut to height, or repurpose folding sawhorses from a home improvement store. Folding sawhorses cost about $25 to $40 a pair and are great for portability. For the front and side panels, you’ll need black fabric or scrim. Speaker grill cloth is ideal because it lets sound through, but heavy black cotton fabric or muslin works fine. Cost: $10 to $20 for enough to cover a standard booth. You’ll also need clamps (quick-grip squeeze clamps are a lifesaver), gaffer tape (not duct tapeâit leaves residue), velcro strips, and staples. Optional but recommended: a cheap power strip with a long cord, cable management clips, and a small surge protector. Total for a solid starter kit: about $100 to $150. For a minimal rig, you can get away with a folding table (around $40 from Amazon) and a piece of fabric draped over the front. That’s a $50 setup. But if you plan to use this booth regularly, invest in better materials.
Step 1: Choosing the Right Size and Layout for Your Booth
Before you build anything, measure your gear. Place your controller, laptop, and any monitors on a flat surface and measure the width and depth they take up. Add a few inches on each side for cables and airflow. Common booth widths are 4 feet (for a single controller setup) to 6 feet (if you have multiple decks or a large mixer). Depth should be shallowâaround 24 to 30 inches. Deep tables cause problems: you lose sightlines, you can create standing waves that mess with monitor sound, and it’s harder to reach cables. For height, aim for a table surface that matches your standing elbow heightâusually around 40 to 44 inches for most people. This keeps your hands comfortable and your gear visible. If you’re building a mobile booth, consider a vertical layout where the top shelf holds your controller and a lower shelf holds your laptop or turntables. This saves space and improves sightlines. For a fixed home studio, you can build a larger booth that doubles as a desk. The key: prioritize accessibility and monitor placement over size. Don’t build a booth so big it overwhelms the room or creates acoustic problems.
Step 2: Building the Frame â DIY vs. Pre-Built Kits
This is where you make the biggest decision in terms of cost, time, and portability. DIY option: A frame made from 2×4 lumber and 3/4-inch plywood panels. Cut the lumber to your desired height and width, screw them together to form a rectangular box frame, then attach plywood panels to the front and sides. This costs around $40 to $60 in lumber and hardware. It’s stable, customizable, and looks professional when covered. But it’s heavyâyou’re looking at 40 to 60 pounds depending on the size. Not ideal if you’re hauling it to gigs every weekend. Portable pre-built kits: Companies like American Pro Audio and Global Truss make booth kits with folding legs and snap-together panels. Prices start around $100 to $150 for a basic setup. These are lighter, pack down smaller, and set up in minutes. The tradeoff: less customization and potentially less stability. For a weekly mobile DJ, the portability is worth the extra cost. For a one-off gig or a home studio, DIY is the better value. If you go DIY, invest in good clamps and a circular saw. If you go pre-built, look for kits with metal brackets and dense fabric panels. Avoid anything that looks like a cheap stage propâit will likely collapse under gear weight.
Step 3: Covering and Dressing the Booth for a Professional Look
This is where your booth goes from “scrap wood project” to looking like you actually know what you’re doing. The goal is to hide the raw materials and present a clean, black, uniform surface. The cheapest method: buy a bolt of black stretch fabric or speaker grill cloth. Cut it to size, leaving enough to wrap around the front and sides. Attach it using a staple gun, velcro strips, or fabric glue. Staples are fast and hold well. Velcro allows you to remove the fabric for cleaning or replacement. Fabric glue is messy and not recommended. For the top surface (where gear sits), use black paint or laminate to avoid shiny reflections that cause glare during shows. If you want to brand your booth, place a logo on the front panel using fabric paint or a custom wrap. Keep it small and below eye level. Avoid reflective materials like gloss paint, vinyl, or metallic finishes. They look bad under stage lights. A properly dressed booth costs about $20 to $30 in fabric and takes an hour to attach. It’s the most visible improvement you can make for the least money.
Step 4: Sound Treatment and Acoustic Control on a Budget
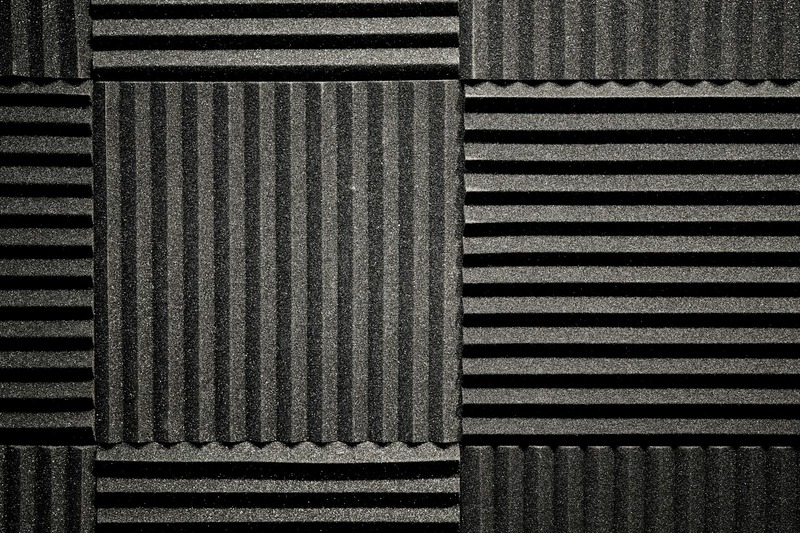
A DJ booth doesn’t need full studio treatment, but you do need to manage reflections and feedback. Monitor feedback happens when sound from your speakers hits the booth’s front panel and bounces back into microphones or the audience area. Solution: place acoustic foam tiles or moving blankets on the front and side panels of the booth. Moving blankets cost about $10 to $15 each and work surprisingly well. Cut them to size and attach with velcro. They dampen reflections without completely deadening the room. If you want something cleaner, buy budget acoustic foam tiles (about $20 for a pack of 12) and mount them on the back of the fabric or directly onto the plywood. A common mistake is over-damping a small room. If you cover all surfaces, the sound goes dead and you lose liveliness. Focus treatment on the area behind your monitors and the sides of the booth. If you’re playing in a large venue, you don’t need much treatmentâjust make sure the booth doesn’t create a standing wave. A good rule: if you hear a hollow boom when you clap near the booth, add more absorption.
Step 5: Cable Management and Power Distribution
Nothing kills a professional look faster than a mess of cables dangling around. And it’s dangerousâtripping over cables is a common accident at gigs. Start with velcro cable ties. They’re reusable, cheap (about $8 for a pack of 20), and let you bundle cables neatly. Run all cables along the back edge of the booth and secure them with cable clips or loops. For the long runs (power cables, XLR cables), use a cable channel or even a piece of PVC pipe attached under the booth. This keeps them out of sight and away from feet. Power distribution: get a surge protector power strip with a 10-foot cord. Plug all your gear into it. If you play outdoor gigs, add a battery backup (about $50) to avoid power drops. Plan your power path: run the cord down one leg of the booth, under the table, and to a wall outlet. Use gaffer tape to secure the cord to the floor near your booth to prevent tripping. Never rely on a single outlet with a cheap extension cordâthat’s how you blow a fuse mid-set. A good cable management setup costs under $30 and saves you from looking like a hobbyist.
Common Mistakes When Building a Budget DJ Booth
Even with good intentions, beginners mess up. Here are the most frequent mistakes I’ve seenâand how to avoid them.
- Undersized table space: You think your controller fits, but you forget about your laptop, phone, and a drink. Always measure with all gear in place and add 6 inches of buffer. Trust me, you’ll need it.
- Ignoring monitor isolation: Speakers sitting directly on the booth surface vibrate through the structure and cause muddy sound. Use isolation pads or even foam blocks under the monitors. Cheap fix for a huge improvement.
- Flimsy materials that collapse: Using particle board with no bracing creates a booth that sags under weight. Use at least 3/4-inch plywood or MDF. Reinforce corners with metal L-brackets.
- Poor access to power: You build a booth with no holes or slots for cables. Now you have to drill through it mid-set. Plan cable access from day one.
- Forgetting portability: You build a permanent booth with no folding mechanism or disassembly plan. Then you get a gig and realize it won’t fit in your car. If you plan to move it, design for that.
Each of these mistakes adds cost or stress later. Avoid them and your build will last longer and perform better.
Budget Breakdown: What You Actually Spend (With Examples)
Here’s what a real budget build looks like, with two common tiers:
$50 Minimal Rig (Good for occasional use, home practice, or a single event)
- Folding table (6ft): $35 from Amazon or hardware store
- Black fabric (3 yards): $10 from craft store
- Clamps or velcro: $5
- Total: $50
This setup works for one night. The table is your surface, the fabric covers the front and sides. No frame, no treatment, no real cable management. It looks okay from a distance but won’t hold up to regular use.
$150 Functional Booth (Reliable for weekly gigs or a home setup that looks pro)
- Plywood sheet (3/4-inch, 4×8): $40
- 2×4 lumber for legs: $15
- Screws, L-brackets, glue: $10
- Black speaker cloth or stretch fabric: $20
- Budget acoustic foam (12-pack): $20
- Velcro strips and cable ties: $10
- Power strip with long cord: $15
- Isolation pads for monitors: $20 (optional but recommended)
- Total: $150
This gives you a proper frame, sound treatment, cable management, and a professional look. You can build it in a weekend with basic tools. For most DJs, this is the sweet spot.
Portable vs. Permanent: Which Design Suits Your Setup?
If you’re a mobile DJ, portability is everything. Your booth needs to fold down quickly, fit in your vehicle, and survive frequent loading and unloading. In that case, use a design with hinged panels or a snap-together frame. Global Truss and American Pro Audio kits are the gold standard, but you can also build a DIY portable version using 2×4 lumber with corner hinges. Keep the total weight under 30 pounds if possible. Use a heavy-duty rolling bag (like a dolly cart) for transport. If you’re building a home studio booth, you can go bigger and heavier. Use thicker materials, add more acoustic treatment, and create a permanent desk-like structure. The tradeoff is simple: mobile booths cost more upfront in exchange for convenience; permanent booths cost less but lock you in place. Match your design to your gig frequency. Weekly mobile work? Invest in portability. Occasional home mixing? Build it solid.
Final Setup Checklist Before Your First Gig
You’ve built your booth. Before you show up to the venue, run through this checklist to avoid last-minute disasters.
- Test all cable lengths. Can they reach the power source? Do you have spares?
- Check power distribution. Plug everything in at home and verify no trips.
- Secure fabric. Make sure it’s tight and won’t shift during setup or tear down.
- Level the table. A wobbly booth throws off your timing and looks sloppy. Use shims if needed.
- Confirm monitor isolation. Play a loud track and check for rattle or muddy bass.
- Pack spare clamps and gaffer tape. You’ll always need one more cable tie than you brought.
- Test sightlines. Stand in front of the booth at audience height. Can you see your gear clearly?
This checklist takes 15 minutes. It prevents most of the common issues that ruin a gig.
Frequently Asked Questions About Building a DJ Booth on a Budget
Can I use an IKEA table for my DJ booth?
Yes, but with caveats. IKEA tables like the Linnmon or Melltorp are cheap and look clean. But they’re not built for heavy gear or frequent moving. The tabletop can warp under weight, and the legs aren’t always stable. If you use one, reinforce the legs with L-brackets and keep the setup light. It’s a good temporary solution, not a long-term one.
How do I stop speaker vibration from ruining the sound?
Place isolation pads or foam wedges under your monitors. Also, make sure the booth itself is not touching walls or furniture. Any physical contact creates coupling, which transmits vibrations into the structure. Decouple the speakers and the booth.
Can I build a booth with PVC pipe instead of wood?
PVC is light, cheap, and easy to cut. It works for a portable frame, but it’s not very stable under heavy gear. Use PVC for a minimalist setup with no monitors. For anything more, stick to wood or metal.
Does the booth need a roof or canopy?
Only if you’re playing outdoor events or want to create a closed-in space for better sound isolation. A roof helps with direct sun and rain. For indoor gigs, a roof is not necessary and can actually block sightlines. Skip it unless you have a specific need.
Get Started Building Your Booth Today
You have the blueprint. The next step is picking a plan based on your budget and how often you actually play. If you’re an occasional home DJ, the $50 folding table rig will get you started. If you’re playing out regularly, the $150 functional booth is the better investment. Don’t overthink the detailsâfocus on getting a solid frame, clean fabric, and basic cable management. Those three things will make more difference than any fancy panel or branded accessory. You can always upgrade later. Start with what you have, build for your current needs, and treat this as an investment in your reliability as a performer. A good booth isn’t about appearancesâit’s about making your job easier so you can focus on the music. Pick your plan, gather your materials, and build something that works for you.